Recently I tweeted about the Azure App Service Team announcement that you can now officially run MySQL in-app, that means running MySQL using the same resources as your web app instance. I see this as a game changer as we move to microservices a natural paradigm shift is also to move away from monolithic databases too. I’ll follow up more on this in future posts, but right now this post is about migrating your existing WordPress blob to Azure.
Well this is a game changer just found out #Azure have released MySQL in app my wordpress blog is moving over today!https://t.co/Ndj7X0qsOm
— Darran Jones (@DalSoft) September 7, 2016
One of the biggest selling points of Azure is Platform as a service (PaaS) meaning you don’t need to worry about installing and updating the operating system this is taken care of for you. Unfortunately until now Azure options for MySQL were limited to a IaaS VM or ClearDB both of which are not really desirable.
Now with a couple of clicks you can have a in-app MySQL database. This is great news for this blog, I’ve tried myself hosting MySQL in a worker role to take advantage of PaaS and keep costs down, but now I don’t need to worry about using a hacked solution. In this blog post I’m going to show you how to migrate your existing WordPress to an Azure Web App with in-app MySQL. I’m pleased to say this blog is now running on a Azure Web App with in-app MySQL after migrating from Amazon Web Services.
Contents
Steps to migrate your existing WordPress to an Azure Web App with in-app MySQL
Step 1 Backup your existing WordPress blog
-
Backup your old WordPress database by running this command against your MySQL database (replacing the placeholders with your values):
mysqldump --add-drop-table -h YourServersIPOrHostName -u YourUserName -p YourWordPressDB > wordpress-backup.sql
-
Zip up the resulting sql file and name wordpress-backup-sql.zip
-
Zip up the root of your old WordPress site and name it wp-backup-content.zip
Step 2 Create Azure Web App with In-App MySQL
-
In the normal way create a new web app (you can also add to an existing web app). Unless your making use of it turn app insights off.
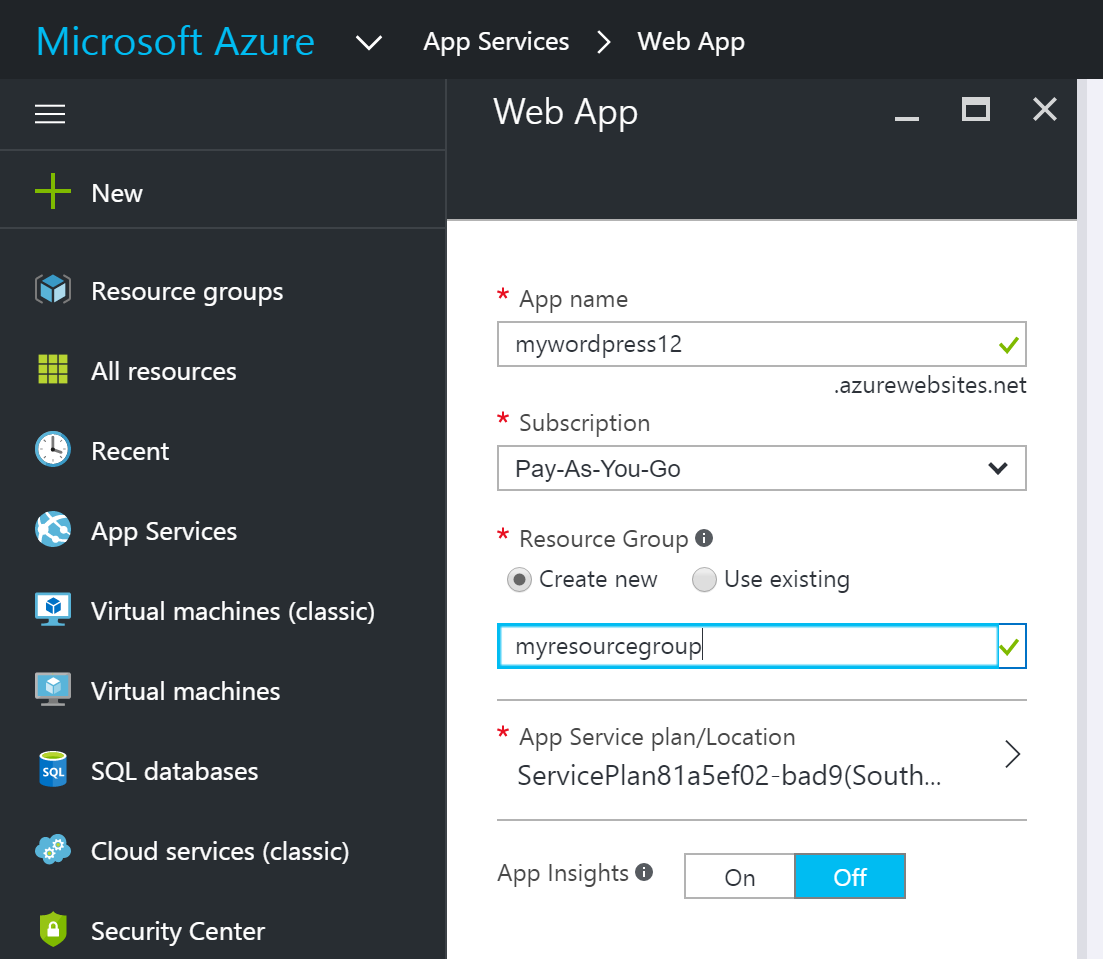
-
Turn MySQL on


Step 3 restore your WordPress blog to your new Web App
-
Using the Azure portal for the Web App you just created open Kudu.
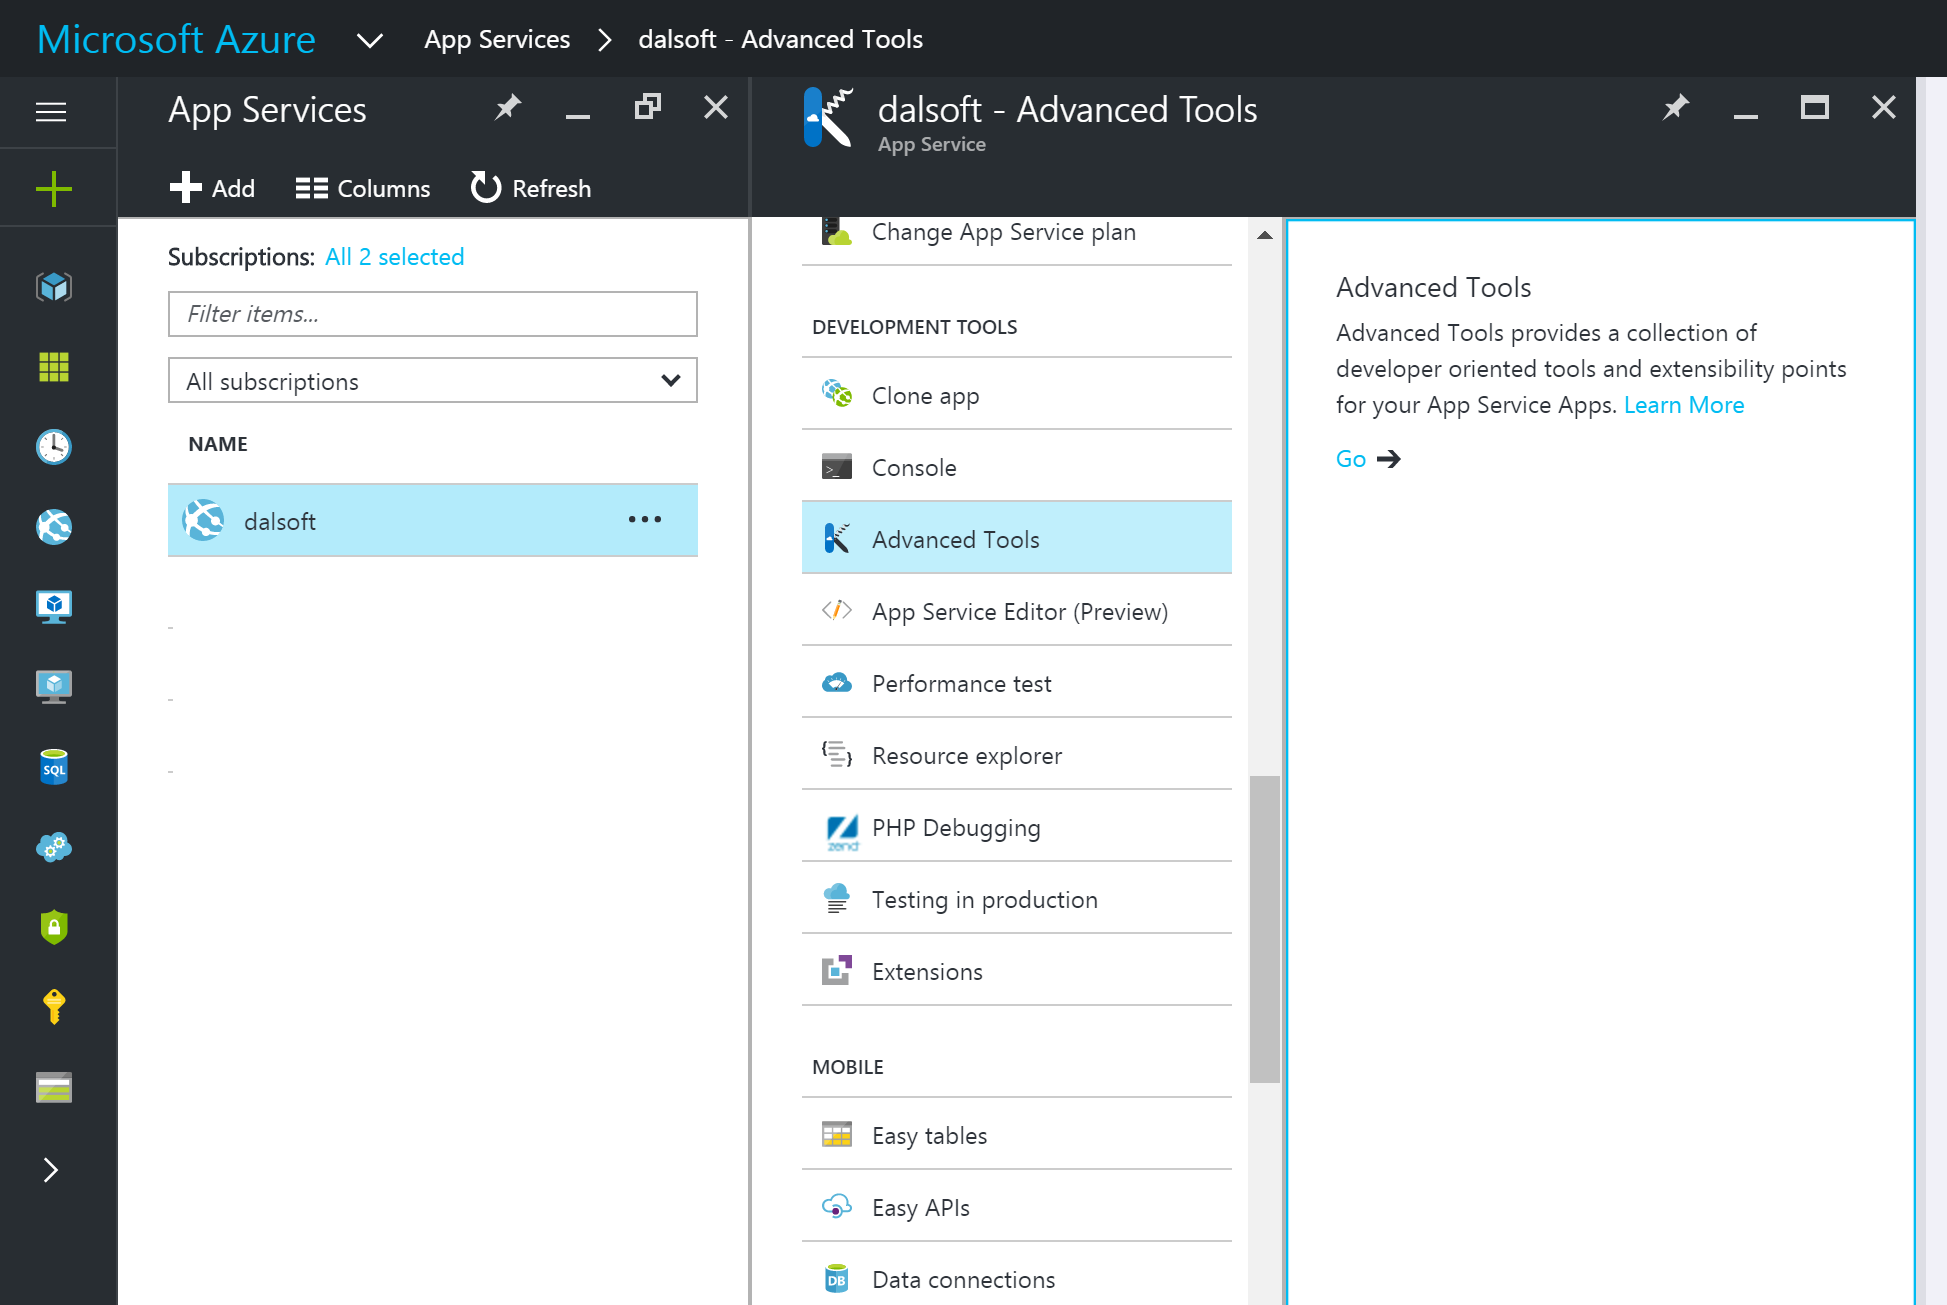
-
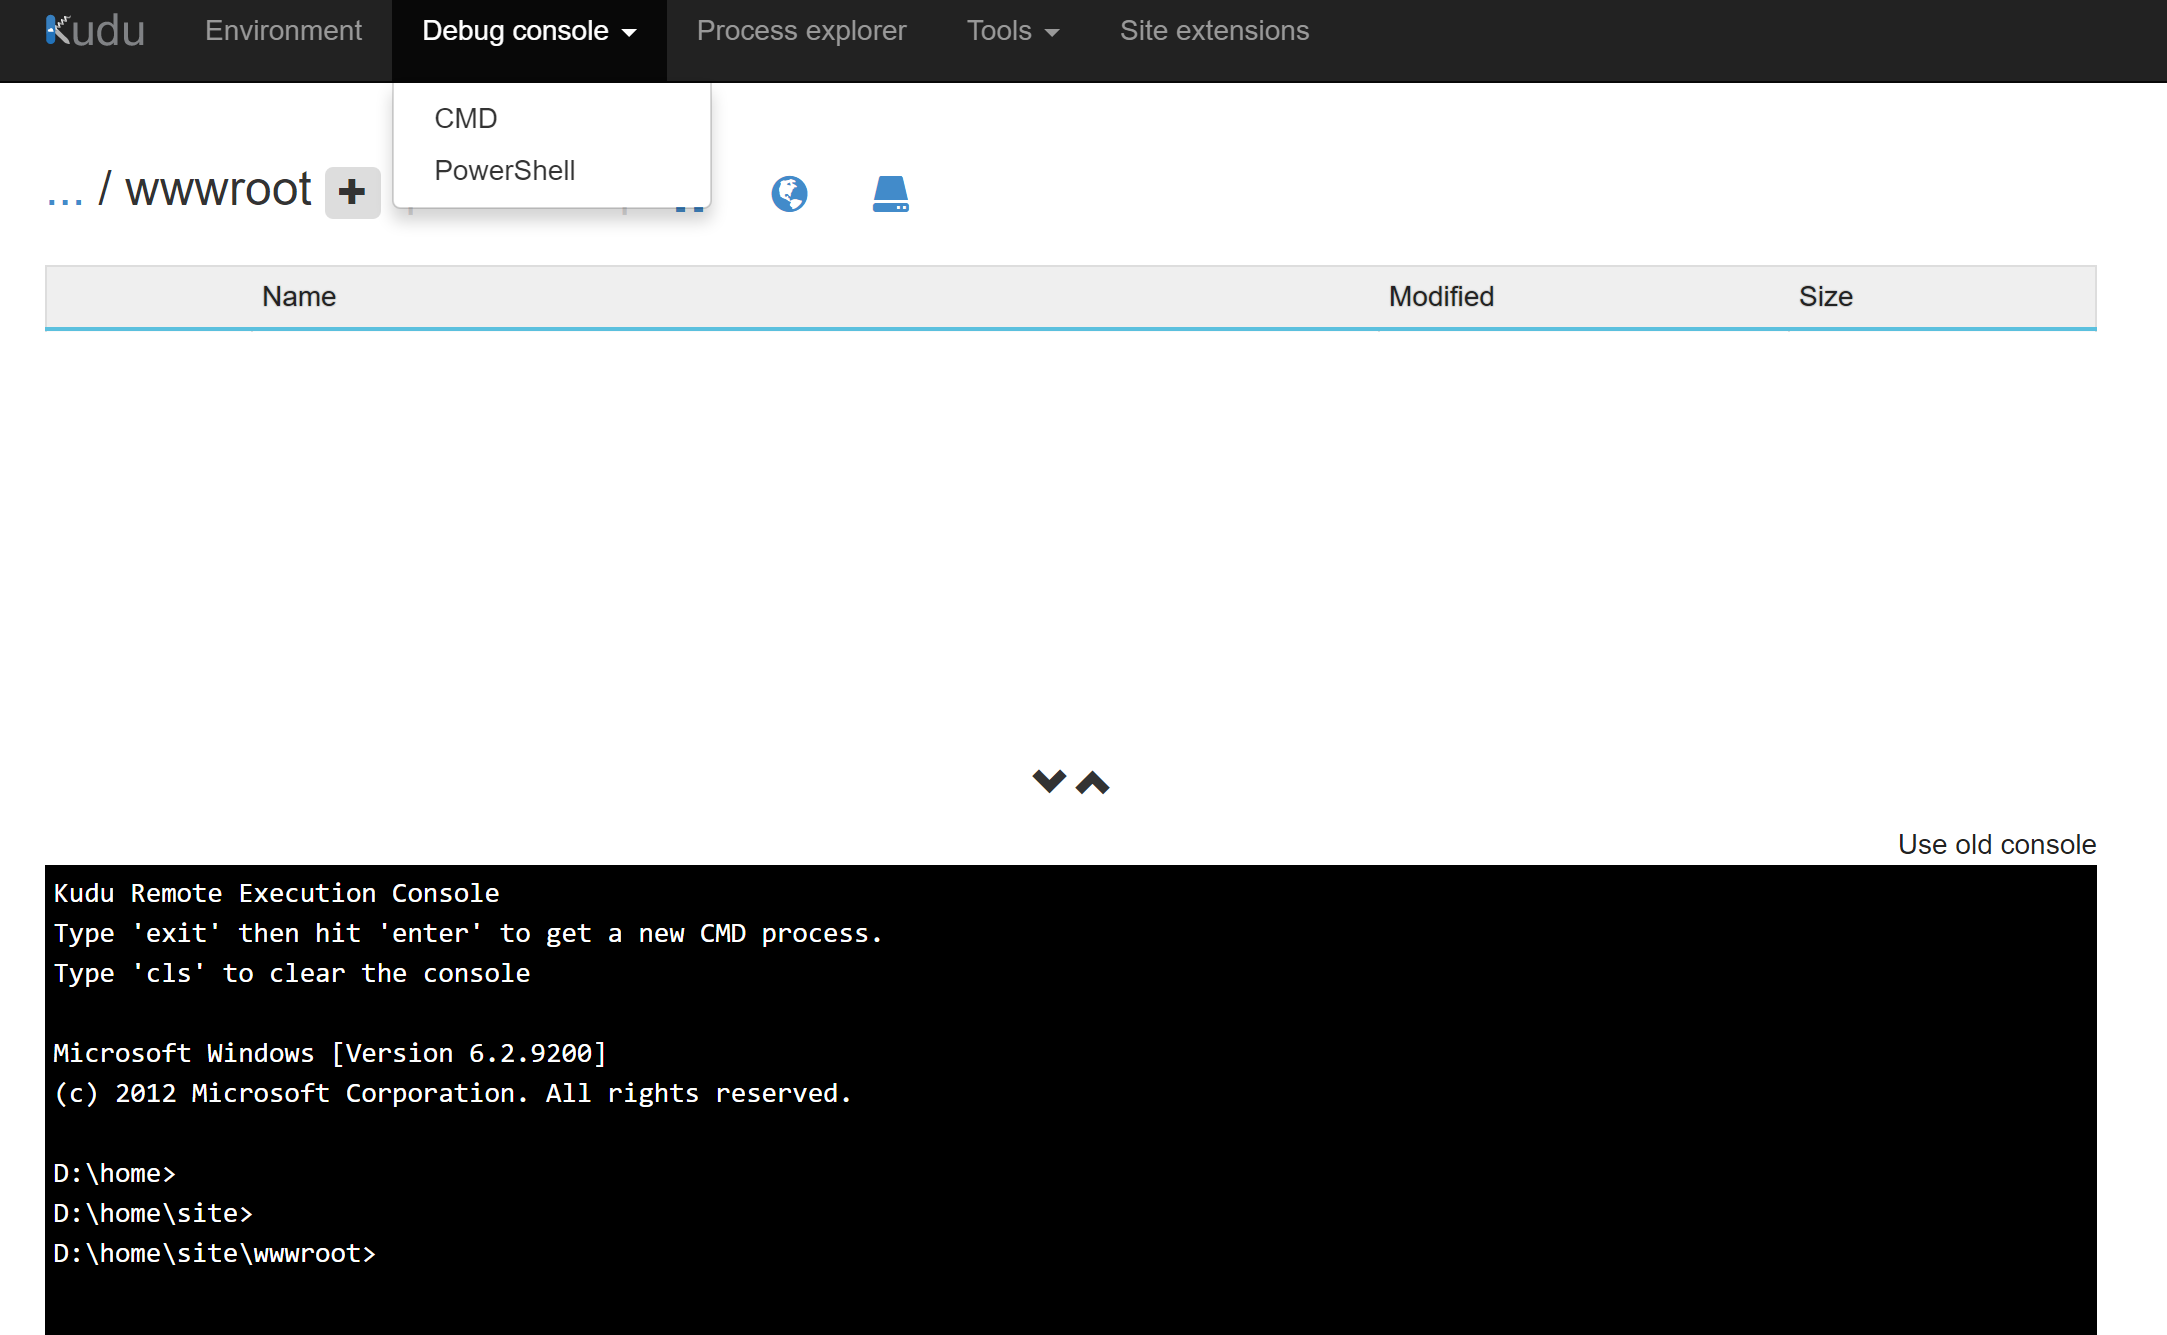
In Kudu click ‘Debug Console’ -> ‘CMD’ then Navigate to \home\site\wwwroot
-
Drag and drop the wp-backup-content.zip backup of your WordPress blog to Kudu.
-
If your wp-backup-content.zip backup is large Kudu won’t automatically unzip the zip contents for you. If this is the case (it was for me) then copy the following command to the Kudu Command Prompt:
D:\home\site\wwwroot> wp-backup-content.zip
It will work but will take a while.
-
Now we are going to restore the MySQL database, to do this head over to the Azure portal, click on the web app you created and click on the MySQL blade, now click on the ‘Manage’ button.
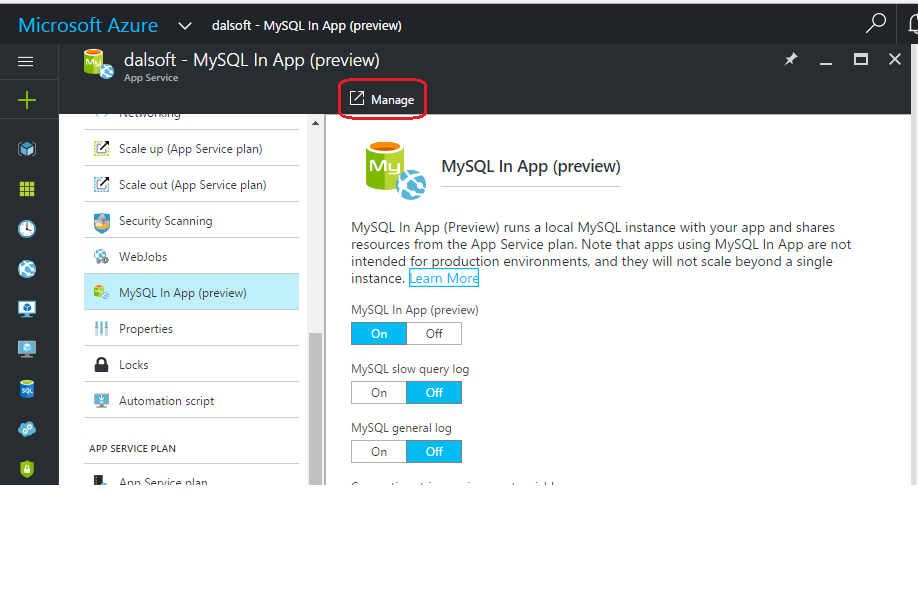
-
Depending on the state of your web app you may get asked for a username and password. This means that your web app isn’t initialized yet. If this is the case don’t try to login, instead just open your website using a browser (url can be found in the overview blade). You will get an an error but it will initialize the MySQL instance.
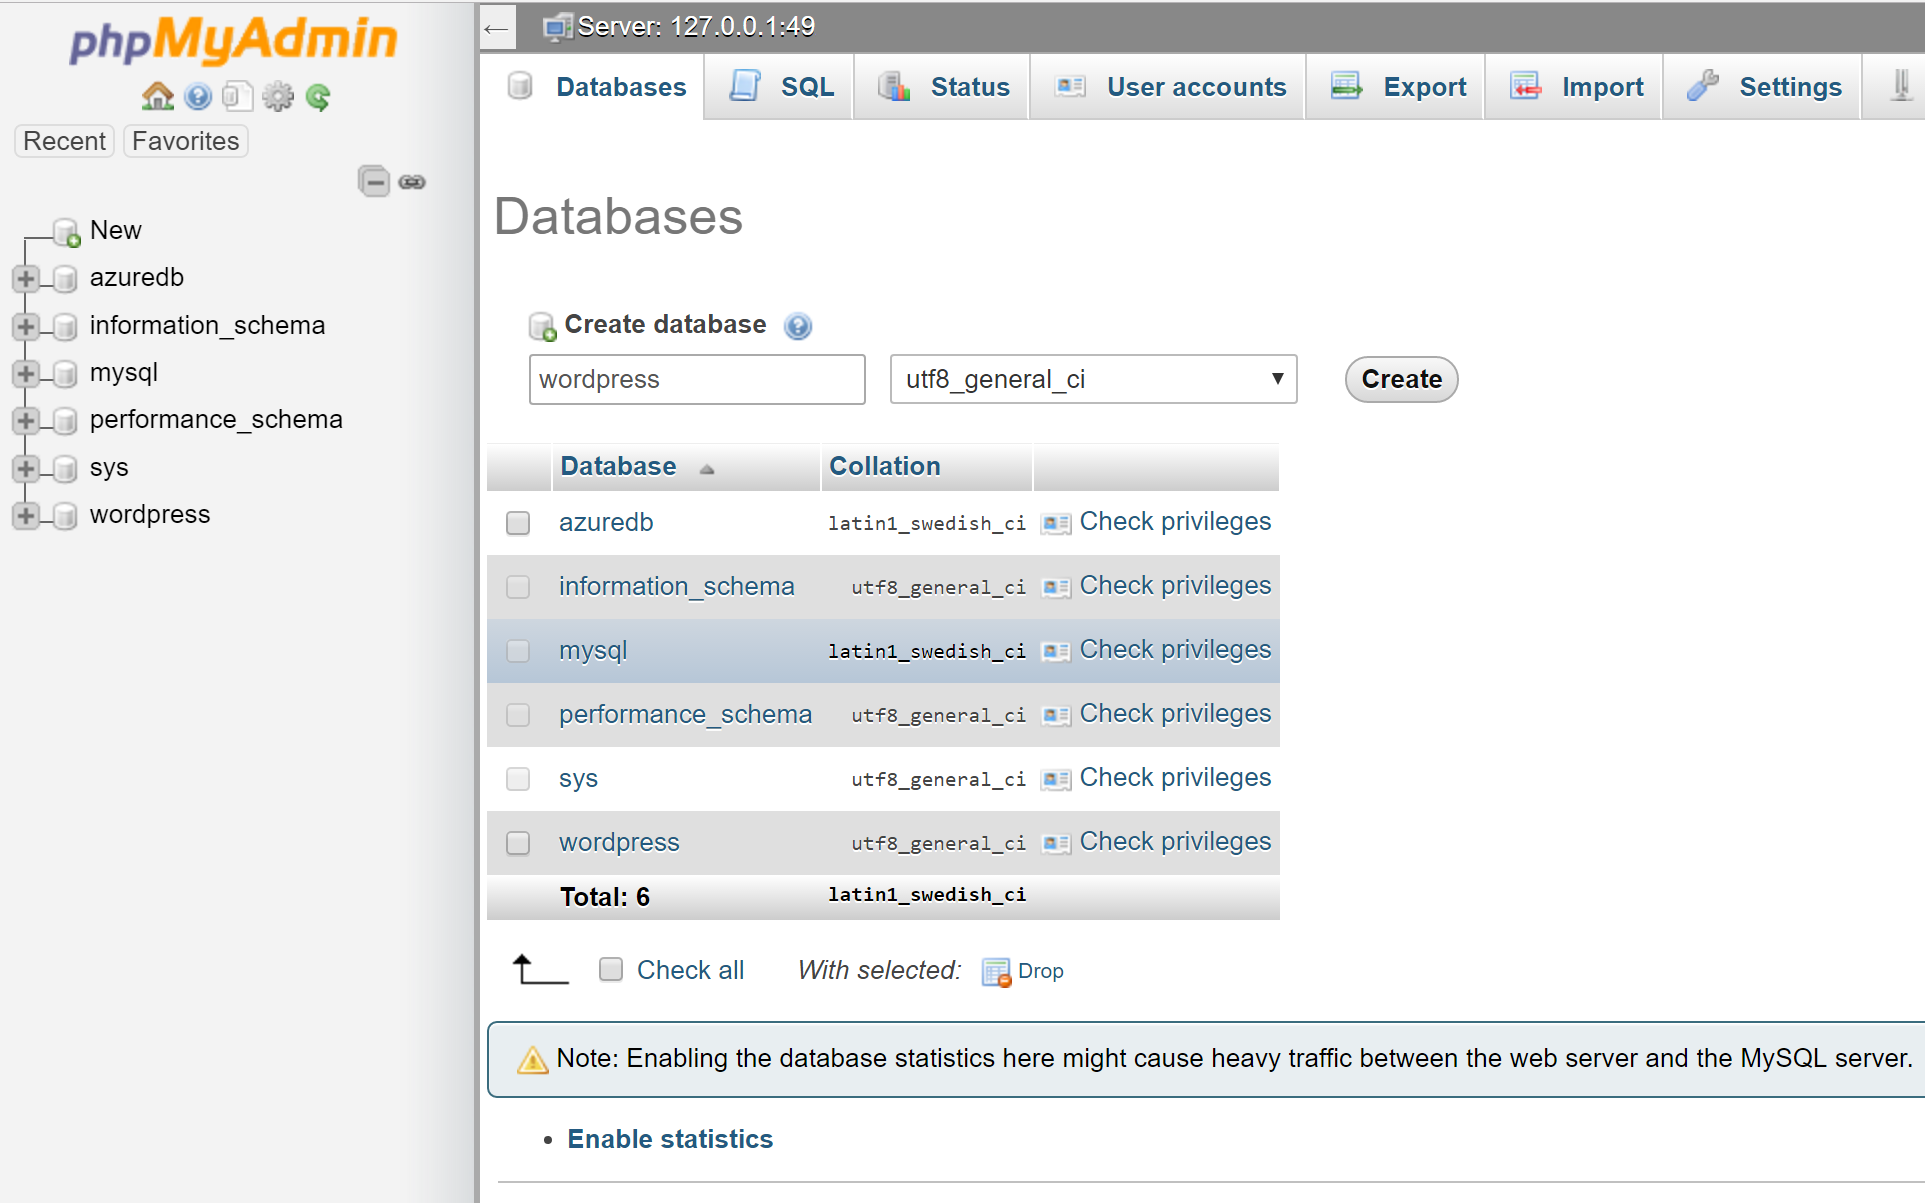
From the Azure portal ‘Manage’ should now open phpMyAdmin. From here we need to create the wordpress database. To do this click on the ‘Database’ tab. Name the database ‘wordpress’ and set the collation to ‘utf8_general_ci’ (for some reason the server collation defaults to ‘latin1_swedish_ci’).
-
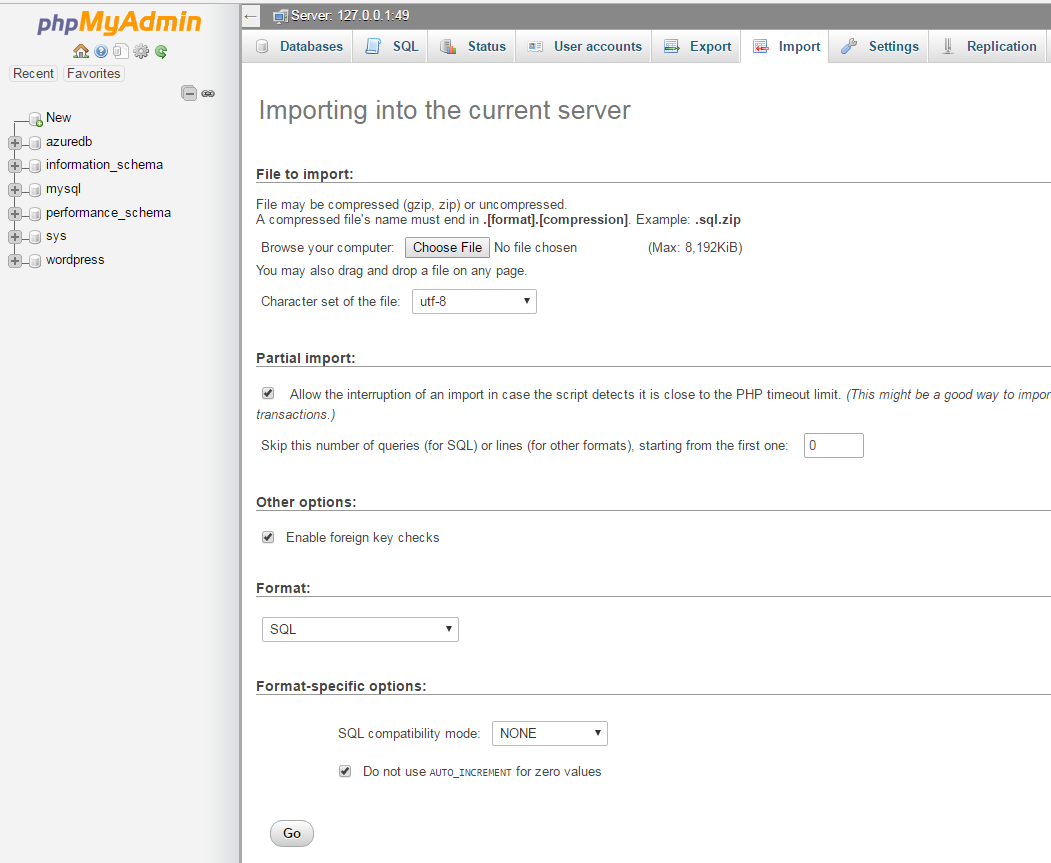
Next we need to import our blog data to our MySQL database. To do this click on the ‘Import’ tab and upload the backed up sql wordpress-backup-sql.zip you made in the previous step. Note if your backup is over 8MB you will need to split it up.


Step 4 Change your WordPress config
-
Now we have restored both the WordPress site and database. All we need to do is change the configuration to point to the new database. Using Kudu again edit wp-config.php in the root of your web app. First off we need to change the settings to point to our in-app MySQL instance, by changing the following values:
/** MySQL database username */

define('DB_USER', 'azure');
/** MySQL database password */
define('DB_PASSWORD', 'password');/** MySQL hostname */
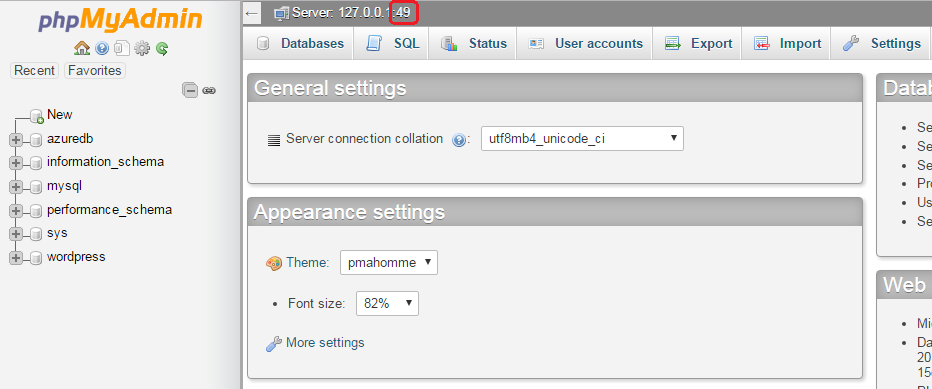
define('DB_HOST', 'localhost:49');
Now is a good time to explain how the in-app MySQL instance works, you can only access the instance locally, therefore the user name is always ‘azure’ and the password is always ‘password’. The only thing that differs is the host it’s always localhost of course, but the port number is random, in my case it’s ’49’ (it’s not but for the purpose of explaining lets assume it is). How do you find what your port number is? Simple as you did when you did the sql import in the Azure portal go MySQL blade -> ‘Manage’ button, then from phpMyAdmin you will see what your port number is.
-
Next you need to change the url in wp-config.php to the new url. The new url can be found in the Azure portal for your web app in the ‘Overview’ blade.
define('WP_SITEURL', 'http://www.dalsoft.co.uk');
- Well done!!! Now your WordPress blog is migrated to Azure you are Awesome. Login to your migrated WordPress blog as there is one more setting to change from WordPress itself. Once logged in click on ‘Settings’ and under general settings ensure that both ‘WordPress Address (URL)’ and ‘Site Address (URL)’ are the same url you set in wp-config.php.

Step 5 DNS (optional)
Now you can test your blog using the Azure url once you are happy it’s time to point your DNS to your new blog. This is the same as any web app and you can find instructions here https://azure.microsoft.com/en-gb/documentation/articles/web-sites-custom-domain-name/. The only other thing you would need to do then is change the urls you set in wp-config.php and WordPress.
Conclusion
For a couple of weeks now I’ve been running my blog on an Azure Web App with in-app MySQL, and I’ve been really happy with the results. Not that WordPress is the quickest anyway but I’ve noticed that my blog loads a bit quicker. I’m also saving over 50% (it’s costing me about £22 ) vs a VM using Amazon Web Services. I also host some of my other ad-hoc web apps on the same plan saving more money. If you just wanted to get experience setting up WordPress in-app MySQL works on the free and shared plans too, not sure if you could run it though without going over quota but great for testing it out. I’d be interested if anyone manages to run their blog on the free or shared their quota.


Hey,
Thanks a lot for the tutorial!
It works but when i try to goto wp-admin it says it can’t find the db on that port. Do you know what this could be?
Borrie
Hey,
Got it working completely in the meantime.
I think it’s best to drop the localdb, recreate it and then import your backup.
In the wp-config put this as your connection string in stead of the other:
/* Azure in APP MySQL */
$connectstr_dbhost = ”;
$connectstr_dbname = ”;
$connectstr_dbusername = ”;
$connectstr_dbpassword = ”;
foreach ($_SERVER as $key => $value) {
if (strpos($key, “MYSQLCONNSTR_”) !== 0) {
continue;
}
$connectstr_dbhost = preg_replace(“/^.*Data Source=(.+?);.*$/”, “\\1”, $value);
$connectstr_dbname = preg_replace(“/^.*Database=(.+?);.*$/”, “\\1”, $value);
$connectstr_dbusername = preg_replace(“/^.*User Id=(.+?);.*$/”, “\\1”, $value);
$connectstr_dbpassword = preg_replace(“/^.*Password=(.+?)$/”, “\\1”, $value);
}
define(‘DB_NAME’, $connectstr_dbname);
define(‘DB_USER’, $connectstr_dbusername);
define(‘DB_PASSWORD’, $connectstr_dbpassword);
define(‘DB_HOST’, $connectstr_dbhost);
Thanks for posting this, I just also hit a problem where MS have changed how in-app MySQL works so that it uses a different port/password on every app recycle. I used the same code as you have posted to fix it! I’ll update the post shortly to reflect this.